- Graphisoft Community (INT)
- :
- Forum
- :
- Documentation
- :
- Foundation Plan plan representation
- Subscribe to RSS Feed
- Mark Topic as New
- Mark Topic as Read
- Pin this post for me
- Bookmark
- Subscribe to Topic
- Mute
- Printer Friendly Page
Foundation Plan plan representation
- Mark as New
- Bookmark
- Subscribe
- Mute
- Subscribe to RSS Feed
- Permalink
- Report Inappropriate Content
2024-02-05
08:34 PM
- last edited on
2024-02-10
09:13 PM
by
Laszlo Nagy
Just starting ArchiCAD (27) and we are trying to get a workflow and template going.
One problem that we are stuck on is Foundation Plan representation. We do fairly detailed plans for our contractors and rarely have plans that have less than a dozen different top of foundations and ledges. To add to if we do a majority of Walkout Foundations. Many times we do precast plank Garage floors and inset ledges for floor trusses (to keep main floor closer to grade.)
It doesn't seem like Complex Profile walls give you the control of display of each "skin" e.g. showing the line of multiple ledges in a foundation wall, please educate me if I'm wrong!
I've tried modeling each different thickness of poured foundation wall as it's own composite and stacking walls. (e.g. 12" thick at 8' tall, 8" thick at 12" above that, etc.) But I still can't get this to display correctly in plan automatically.
Looks great in 3D.
It seems like the display priority is all out-of-whack and I need to manually adjust every wall to display above the previous one. This is very tedious, time consuming, and just doesn't feel efficient in any way. There has to be an easier way. You would think you could just do an "aerial view" and see all the different ledges and foundation widths.
The other reason I went down the "stacking walls" route was to get automatic labels for our foundation heights. We label all of our wall heights for the contractor from Sea Level. "Stacking" the walls let's me attach a label at each ledge. Doesn't see like there is a way to tag each height on a Complex Profile. Is there?
The only way I've been able to achieve the detailed plans we were able to produce in AutoCAD is by doing the AutoCAD way and doing manual fills. The opposite of what BIM is supposed to achieve.
Is there a better way to do this?
Am I just not seeing an easier way?
Please enlighten me oh great ArchiCAD sages.
Attached are a couple a snippets of our Foundation plan in Autocad that we are trying to achieve.
- Labels:
-
Annotation
-
Drawings
-
Fills
- Mark as New
- Bookmark
- Subscribe
- Mute
- Subscribe to RSS Feed
- Permalink
- Report Inappropriate Content
2024-02-06
04:04 AM
- last edited on
2024-02-10
09:39 PM
by
Laszlo Nagy
To display multiple ledges on a Complex Profile beam, you can adjust the 'Floor Plan Display' settings in the Element Settings dialog. Begin by setting the 'Floor Plan Display' to either 'Projected with Overhead' or 'Projected'. Then, ensure the Projection Mode is set to 'Projected' and 'Show Projection' to 'Entire Element'. This configuration should allow all ledge lines to be visible. Bonus: with the use of MVO's you can set beams to "Hidden Line under Slab" in order to automatically appear dashed if located under a slab. See example below:
Some relevant articles:
Dimensioning Multiple levels of a Complex Profile:
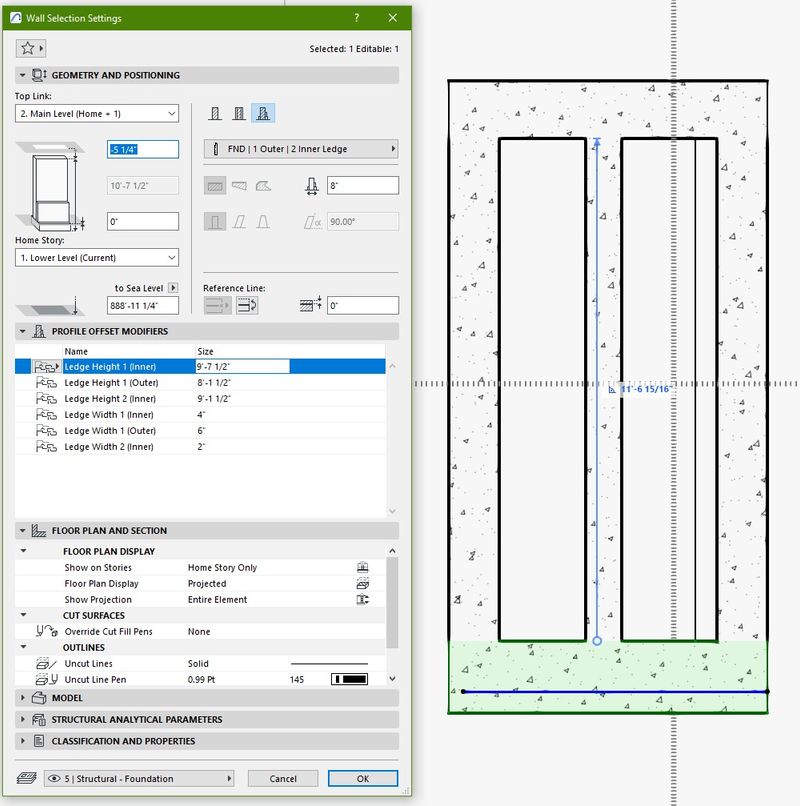
For the more intricate task of showing dimensions to the different ledges or levels of the complex profile, a viable workaround involves combining Expression Defined Properties with Profile Modifiers. Although this process won't be fully automated—requiring you to select the appropriate autotext for your labels—it should meet your needs. By creating profile modifiers for each ledge, you can label the height of each ledge relative to the bottom of the profile. Then, you'll need to create an expression property that adds the ledge height to the 'Bottom Elevation To Sea Level'.
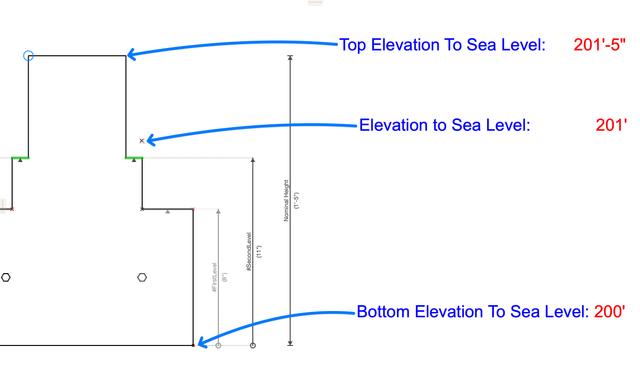
In the accompanying image, I've illustrated a complex profile to clarify the different parameters related to Sea Level. In this example I've set the project's Altitude (Sea Level) to 200'. If the complex profile beam shown is modeled 1' above the home story, the reference line would be at 201'. It's important to note that the 'Elevation to Sea Level' parameter reflects the height of the reference line in relation to sea level, the reference line is often used as a datum point which ideally should align with the reference lines of wall cores and/or slab edges in order to facilitate modeling and modifying all these elements at once. For this reason we will use the 'Bottom Elevation To Sea Level' in our expression later on which marks the bottom of the complex profile.
Adding the Profile Modifiers
1. To add a new modifier, click the 'New Modifier' button, which prompts you for a name.
2. Begin placing the modifier by clicking on the center of your line.
3. Fix the modifier to a specific location by clicking on the bottom node.
4. Move cursor aside in order to select the modifier dimension's location and clicking to finalize the placement.
5. Add the opposite side to the modifier by pressing the + button in the screenshot.
6. Repeat steps 2 to 4 for the opposite side of the line.
For further guidance on creating modifiers, refer to the following guide: Create New Offset Modifier - Example
NOTE: In my example, I've named the modifiers sequentially from the bottom, with the first ledge named '#FirstLevel' and the second '#SecondLevel'. Maintaining consistent naming conventions is crucial for applying the same labels across multiple complex profiles.
Creating the Expression:
Follow the steps in the Archicad Reference Guide which illustrates how to create a new Expression-Defined Property. Create a New Expression-Defined Property: Step By Step
For the expressions, I've made two: 'Level1 + Sea Level' and 'Level2 + Sea Level'. Set the Data Type to 'Length'. In the expression editor, add your chosen modifier under the 'Profile Modifiers' dropdown, and the 'Bottom Elevation To Sea Level' from the 'General Parameters' dropdown. Insert a Plus symbol between these parameters to sum them, and replicate this process for any additional levels needed.
After setting up, these new Expression Properties can be utilized as Autotext in your labels to mark different heights. Note that you will still need to manually position them or configure a label that encompasses all levels in one, You could ultimately also use these new properties in any schedules that you create.
Jan Millán
Customer Enablement Specialist, Graphisoft North America
Graphisoft Certified BIM Manager
- Mark as New
- Bookmark
- Subscribe
- Mute
- Subscribe to RSS Feed
- Permalink
- Report Inappropriate Content
2024-02-06 02:16 PM
Thanks for the quick and detailed response, Jan!
I'm going to try this out and see if it gets us to where we want to be.
- Mark as New
- Bookmark
- Subscribe
- Mute
- Subscribe to RSS Feed
- Permalink
- Report Inappropriate Content
2024-02-26
11:04 PM
- last edited on
2024-02-28
07:34 PM
by
Laszlo Nagy
Finally able to get back to this after doing ACAD production.
I have a couple questions.
I am having trouble getting the plan display to look correct, as if from an overhead view (like 3d-Top pic.)
I've tried messing with cut planes, and relative floor plan range, along with changing the display from Projected (with and without Overhead) to just Outlines Only. These seem to get me really close, but not quite. The cleanup is still not correct. I will attach pics of just an odd test sample of walls to further describe. Maybe I just don't have a selection correct or missing something.
Another question is in regards to the expressions units display.
We want the elevations to be in Decimal Feet for the callouts. I know I am able to set the Calculation Units (Under Proj Pref) to decimal (which works great), but then that changes ALL of my label text for Door & Windows and other info we want in Feet & Inches (not so great.)
Is there an expression for conversion to decimal output or another workaround?

- Home storeys of slabs. Not so simple... in Modeling
- Joint modeling error when using the roof and wall tool in Modeling
- IFC Import - Messy homestories in Collaboration with other software
- [ LONG POST ] - I'm a new user, hoping to ask if ArchiCAD is the best program for my use-case. in General discussions


